Musebox Scripting
Musebox’s scripting interface lets you build custom workflows using media and metadata in your libraries.
Apps that support the macOS Open Scripting Architecture have a scripting dictionary that describe a set of verbs (commands or actions, such as open) and nouns (objects, such as album). You write scripts to combine the actions with object specifiers (queries) to control various apps.
Important: Musebox’s Help book (available from the
Key resources
- Mac Automation Scripting Guide
- AppleScript Language Guide
- JavaScript for Automation Release Notes
- macOS Automation
Choosing a scripting language
You can script apps using AppleScript or JavaScript by using the Script Editor app located at /Applications/Utilities on your Mac. You can check its help book from its Help menu for information about how to choose a scripting language.
AppleScript
- English-like syntax that’s great at combining verbs and nouns across different apps
- Lots of information and examples on the Internet
- It’s not actually English, which can make writing scripts unintuitive
- It’s cumbersome to write algorithms such as sorting using verbs and nouns
JavaScript
- Great at algorithms and manipulating data, has facilities built-in for things like sorting
- Very few examples on the Internet for controlling apps with JavaScript
- Combining verbs and nouns is simpler with AppleScript
- You’re still writing an OSA script; you’re not writing .js files and can’t use ECMAScript modules or packages
Delegating to other languages
You can use the do shell script facility to incoporate anything that can be run from the macOS command line, including scripts written in python. A command line script can use /usr/bin/osascript to run an AppleScript to communicate with Musebox.
You can also import system frameworks such as Foundation to use native macOS APIs directly from AppleScript (the sample AppleScript below for sd-webui uses this).
Musebox’s Scripting Dictionary
You can view Musebox’s full scripting dictionary from Script Editor by using the
Although your media files are represented as file assets in the scripting dictionary, you’ll perform most actions on media versions, which are the same items you work with in Musebox’s user interface. A file asset can have mutliple media versions associated with it, corresponding to the versions you make in Musebox.
The scripting dictionary includes examples for how to do some basic tasks, such as making/duplicating media versions and modifying properties.
Tutorial: Specifying items with AppleScript
AppleScript can be tricky because when reading a script, you can’t tell if a statement is using a reference or a specifier. This is important when the script runs because most command arguments need to be specifiers, but you may be using a reference instead. When that happens, AppleScript will probably give you an unhelpful error message.
For example, if you have selected multiple items in Musebox and you want to work with the first item, you might try this script,
tell app "Musebox" tell current library get item 1 of selection -- Error! Can't make item 1 of selection -- of current library into type specifier endendThe problem is that selection is a property of the current library that references whatever is currently selected. A reference doesn’t have any items — it points to items.
You can turn a reference into a specifier just by using the get command,
tell application "Musebox" tell current library get item 1 of (get selection) -- OK! end tellend tellBy using get, you obtain the actual items the selection property is pointing to, which is a list of media versions. Using item 1 with a list of items works.
Properties and elements
Objects have two categories of attributes, properties and elements. Elements are just what AppleScript calls relationships, like when an item such as an album is related to a set of other items, such as photos.
While properties are usually references, elements can be used as specifiers. If this is confusing, don’t worry — that’s perfectly normal.
For example, this is the scripting definition for the library object,
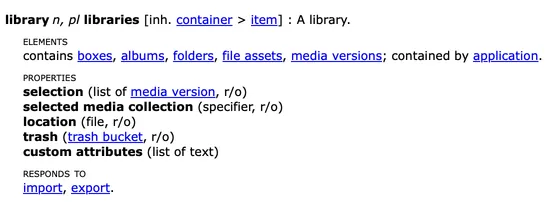
The statement media version 1 of box 1 of current library is good because box is an element. But you have to use media version 1 of (get selected media collection of current library) because selected media collection is a property that references a specifier.
When in doubt, adding a get somewhere might make it work.
Snippets
Most of these snippets assume your script is targeting the current library, for example,
tell application "Musebox" tell current library -- snippet goes here end tellend tellMaking boxes
Making a box with a name
make new box with properties {name:"The Box"}
make new boxset the name of the result to "Just some box"
Making a box if needed
if not (exists of box "The Box") then make new box with properties {name:"The Box"}end ifMaking an album inside a folder
make new album at container "some folder"Importing
Importing the Finder’s selection into a box
set theFilesToImport to {}
-- get some files (aliases) to import.-- This uses the Finder's selectiontell application "Finder"  repeat with aFinderItem in (get selection)    set theFilesToImport to theFilesToImport & {aFinderItem as alias}  end repeatend tell
-- put them into a boxtell application "Musebox"  tell current library    make new box with properties {name:"The Box"}    import theFilesToImport into box "The Box"  end tellend tell
Import by copying files with a subfolder naming preset
This assumes you’ve used the
import theFilesToImport into box "The Box" ¬ by copying files to folder theDestinationFolder ¬ organizing by {adding subfolders:"My Favorite Subfolder Format"}Metadata
In the scripting dictionary, you can see that media versions have various properties, such as name, file name, rating, flagged, etc, and they also have elements for metadata tags, custom tags, and keywords.
The properties of media versions can be used to filter the media versions you want using a whose test. However the elements like metadata tags can’t be used with whose; you’ll have to loop through the media versions you want to check and collect the ones you want to use in a list.
Finding media versions by properties
-- this gets every media version in the library that's flaggedmedia versions whose flagged is true
-- this gets only media versions belonging to the album named "To Share"media versions of album "To Share" whose rating is greater than 2
Updating properties on items matching a query
tell (get the selected media collection) set flagged of ¬ (every media version whose rating is greater than 1) ¬ to trueend tellExporting media versions that match a query
set theCollection to (get the selected media collection)set theFolder to choose folderset theImagePreset to image export preset "JPEG, 50% size" of app "Musebox"export (get media versions of theCollection whose flagged is true) ¬ using image preset theImagePreset ¬ to theFolderCollecting media versions by checking metadata tags
-- collect items where the focal length is ≤ 50set theItems to {}
tell (get selected media collection)  repeat with someMediaVersion in media versions    if exists of (metadata tag "ExifFocalLength" of someMediaVersion) then      if value of metadata tag "ExifFocalLength" of someMediaVersion ¬        is less than or equal to 50 then        set theItems to theItems & {someMediaVersion}      end if    end if  end repeatend tell
-- do something with theItems
To use a metadata tag you have to know its special name. For example, the “Caption/Description” metadata tag’s name is IPTCCaptionAbstract in AppleScript. The easiest way to find the name of the tag you want to edit is to modify it in Musebox and use a script to get it,
get selectionname of every metadata tag of item 1 of the result whose modifiable is true-- Returns {"IPTCCaptionAbstract"}Getting the value of a specific metadata tag
value of metadata tag "IPTCCaptionAbstract" of theMediaVersionSetting the value of a metadata tag
-- this will make a metadata tag or update an existing onetell theMediaVersion to make new metadata tag ¬ with properties {name:theTagName, value:theValue}Setting custom metadata
If Musebox doesn’t have an existing metadata tag for what you want to save, you can just make your own with a custom attribute.
-- this will make the custom tag and library custom attribute if neededtell theMediaVersion to make new custom tag ¬ with properties {name: "Client Feedback", value: "Needs more cowbell."}Example: Import Folders as Boxes
Musebox lets you separate how you need to store files from how you want them organized. For example, if you have photos in your home folder and movies on a removable drive, you can put them into the same box in Musebox.
However, you might already have items sorted into folders in the Finder and you want to make boxes for each of them. Instead of importing them one folder at a time using Musebox’s Import window, you can use a script droplet to automate that.
An AppleScript with an open handler that’s saved as an app is called a droplet. You can drag items onto the app’s icon in the Finder to run the script’s open handler with them.
Ready-to-Use Download
You can download the finished Import Folders as Boxes droplet.
If you want to customize anything (see the notes below), you can make your own droplet from the source code.
Making the Droplet Yourself
- Download the Import Folders as Boxes AppleScript file.
- Open the file using Script Editor.
- Use Script Editor’s
File > Export menu item to save it as an application (select ‘Application’ from the File Format popup button).
Using the Droplet
In the Finder, drag folders that you want to make into boxes onto the droplet’s icon. For each folder you drag onto the icon, the script will make a box using the name of that folder, and then import the folder’s media into the box.
Notes
- It doesn’t make boxes for subfolders, but you can drag multiple folders onto the droplet to make multiple boxes at once
- If a box already exists with the same name, it will just use that instead of making a new one
- It skips items that are already imported, so you can update a box to match the folder’s latest stuff by dragging the folder onto the droplet again
- The script imports RAW+JPEGs together using the JPEG as the master item. If you want different behaviour, just change the
process file pairs using JPEG as masterto use one of the other options in Musebox’s scripting dictionary, likeRAW as master.
Example: Import Stable Diffusion metadata
Musebox defines Generative AI metadata tags which can store parameters for Stable Diffusion images, but it doesn’t import them due to the wide variety of tools and different metadata formats that are available. However, you can set a custom script action to run during import to automatically save parameters from any generative AI tool you use.
This is an example showing how to save metadata from AUTOMATIC1111’s stable-diffusion-webui into Musebox’s Generative AI metadata fields, as well as into custom fields for other data that Musebox doesn’t define.
Preparation: Saving the PNG Info
The sd-webui saves Stable Diffusion parameters in PNG and JPEG metadata. For JPEG files they’re saved in the Exif user comment field. For PNG files, sd-webui saves a custom PNG text chunk named ‘Parameters’. Musebox won’t import this automatically because it doesn’t have anywhere to put it.
However, if you add the custom attribute ‘Parameters’ to your library (
Note: if you’ve already imported images into your library before making the Parameters custom attribute, you can use select the items that need updating in Musebox and use the
Updating Generative AI metadata during import
-
Download the Process Generative AI Images script and save it as a compiled script (a .scpt file) using Script Editor. We recommend saving it to the Script Menu’s Musebox folder so it’s also available when you control-click items in Musebox (see Musebox’s Help book for details).
-
In Musebox, use the
Metadata > Edit Custom Attributes menu command to create a custom attribute named ‘Parameters’ so Musebox imports them from PNG files. -
In the Import window, use the Script Action popup menu to select the compiled script,
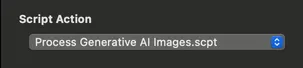
- Click the Import button to start importing your Stable Diffusion images
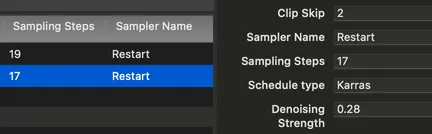
After adding items to the library, Musebox will run the script giving it the items it imported, which will set values for the Generative AI fields and some custom attribute fields. You can customize metadata displays including the Info inspector and list view columns to see the data,
Need help?
For scripting advice we recommend visiting the forums at MacScripter.net and at Late Night Software (makers of the excellent Script Debugger).
Unfortunately our programmers do not have enough caffine to help debug your scripts. Or they might have too much caffine. But if you find an issue with Musebox’s scripting or have a feature request, we’re more than happy to hear from you!
'%3e%3cpath%20d='M1920%200.000167847L0%200.000167847L0%201080L1920%201080V0.000167847Z'%20fill='%23262626'/%3e%3cpath%20d='M0%20-590C48%20-569.666%20186.667%20-503.333%20288%20-468C389.333%20-432.666%20490.667%20-408%20608%20-378C725.333%20-348%20874.667%20-318%20992%20-288C1109.33%20-258%201205.33%20-217.333%201312%20-198C1418.67%20-178.666%201530.67%20-196.666%201632%20-172C1733.33%20-147.333%201872%20-70.3331%201920%20-49.9998L1920%201080L0%201080L0%20-590Z'%20fill='url(%23paint0_linear_13_594)'/%3e%3cpath%20d='M0%20337.928C34.6667%20341.763%20122.667%20358.601%20208%20360.937C293.333%20363.273%20421.333%20365.61%20512%20351.946C602.667%20338.283%20682.667%20281.952%20752%20278.955C821.333%20275.958%20858.667%20326.294%20928%20333.964C997.333%20341.634%201077.33%20327.97%201168%20324.973C1258.67%20321.976%201381.33%20329.646%201472%20315.982C1562.67%20302.318%201637.33%20251.321%201712%20242.991C1786.67%20234.661%201885.33%20262.165%201920%20266V1080L0%201080L0%20337.928Z'%20fill='url(%23paint1_linear_13_594)'/%3e%3cpath%20d='M0%201165.86C58.6667%201141.53%20250.667%201063.21%20352%201019.88C453.333%20976.555%20512%20933.229%20608%20905.904C704%20878.579%20810.667%20883.253%20928%20855.928C1045.33%20828.603%201194.67%20779.944%201312%20741.952C1429.33%20703.96%201530.67%20671.301%201632%20627.976C1733.33%20584.651%201872%20506.329%201920%20482V1080L0%201080L0%201165.86Z'%20fill='url(%23paint2_linear_13_594)'/%3e%3c/g%3e%3cdefs%3e%3clinearGradient%20id='paint0_linear_13_594'%20x1='960'%20y1='-590'%20x2='960'%20y2='1080'%20gradientUnits='userSpaceOnUse'%3e%3cstop%20stop-color='%23595959'/%3e%3cstop%20offset='1'%20stop-color='%230D0D0D'/%3e%3c/linearGradient%3e%3clinearGradient%20id='paint1_linear_13_594'%20x1='960'%20y1='241.428'%20x2='960'%20y2='1080'%20gradientUnits='userSpaceOnUse'%3e%3cstop%20stop-color='%23595959'/%3e%3cstop%20offset='1'%20stop-color='%230D0D0D'/%3e%3c/linearGradient%3e%3clinearGradient%20id='paint2_linear_13_594'%20x1='960'%20y1='482'%20x2='960'%20y2='1165.86'%20gradientUnits='userSpaceOnUse'%3e%3cstop%20stop-color='%23595959'/%3e%3cstop%20offset='1'%20stop-color='%230D0D0D'/%3e%3c/linearGradient%3e%3cclipPath%20id='clip0_13_594'%3e%3crect%20width='1920'%20height='1080'%20fill='white'/%3e%3c/clipPath%3e%3c/defs%3e%3c/svg%3e)